“No downtime” is usually a planning standard, not a magic trick. The practical goal is to keep the old website and old mail flow working until the new hosting environment, SSL, DNS, and mailboxes have all passed a short, disciplined verification checklist.
Most small businesses ask the same operational questions before a migration. When should I lower DNS TTL? Do I move WordPress files first or email first? What happens to SSL if the domain still points to the old server? How do I avoid losing contact-form messages or staff email during the switch? And if something goes wrong, what is the clean rollback path?
For broader planning context, teams can compare guidance from web.dev guidance before choosing a workflow.
This runbook is built for teams moving a WordPress site and business email into one managed control panel. The emphasis is simple: stage first, cut over in the right order, and keep website, DNS, SSL, and email as separate tracks that meet at one change window. If you still need to confirm the service fit before you migrate, review Website Hosting, Email Hosting, and Domains & DNS first.
Written by Lena Ortiz
Updated June 1, 2026
What “No Downtime” Really Means
The question is not whether the migration can be made invisible in every browser and mail client at the same second. The better question is whether you can keep disruption small, predictable, and reversible. DNS caches linger. Email queues retry on their own schedule. Some users hold an older session longer than others. A reasonable default is to define success this way:
Related implementation details are also covered in MDN Web Docs, which helps keep tool decisions grounded in established practices.
- Website: the old site stays live until the new WordPress copy is tested and ready.
- Email: current mail flow continues until new mailboxes, aliases, and DNS records are ready to receive mail safely.
- Rollback: you can restore the old routing quickly if the new environment fails a critical check.
That is why a controlled migration window matters. Lower TTL ahead of time if your DNS editor allows it, document the records you will change, and decide in advance what would trigger a rollback. “We will see how it goes” is not a runbook. It is a mood.
| Decision Area | Reasonable Default | Watch For |
|---|---|---|
| DNS TTL | Lower planned record TTL 24 to 48 hours before cutover when possible | Some providers limit TTL choices or cache longer than you would prefer |
| Change window | Use a low-traffic period with staff available to test site and email | Avoid stacking design, plugin, or mailbox cleanup changes into the same window |
| Rollback rule | Define the exact checks that must pass within the first monitoring window | Do not keep “half-live” DNS and mail changes running without an owner |
Pre-Migration Checklist: Access, Credentials, and Backups
Before you move a single file, confirm that the people handling the migration can reach every system involved. For a typical small-business move, that means four separate access layers:
- Current website access: WordPress admin, file manager or SFTP, and database export access.
- Current email access: mailbox list, aliases, forwarding rules, and enough visibility to verify current MX, SPF, DKIM, and DMARC values.
- Domain and DNS access: registrar login or the active DNS provider dashboard.
- New hosting access: the new control panel, database creation tools, SSL area, and webmail or email account management area.
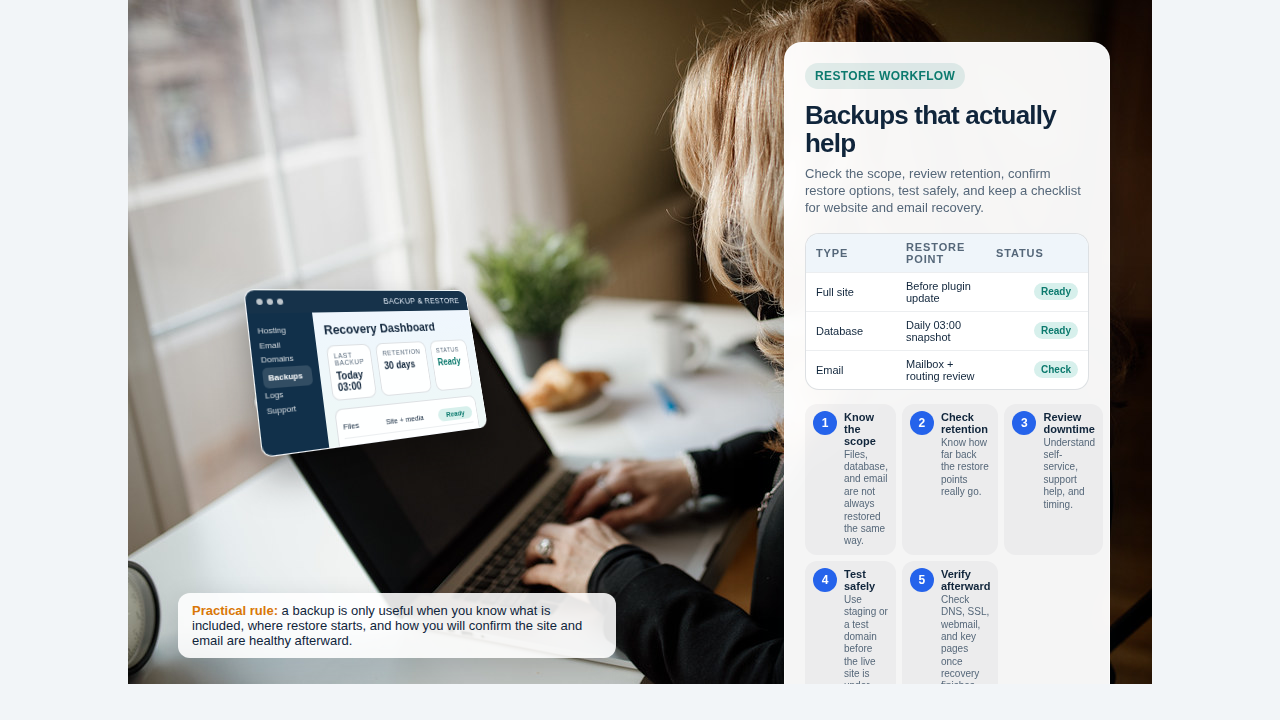
Take current backups before you start, even if the old platform already runs scheduled backups. Export the WordPress database, copy the site files, and record the live DNS zone. For email, export or archive anything the business cannot afford to reconstruct later. The best fit depends on mailbox size and existing tooling, but the principle does not change: do not rely on memory when mail history matters.
It also helps to save a one-page credentials and scope sheet. Keep it private, but include the old server location, the new server location, the active DNS host, mailbox names, aliases, and the current WordPress version and plugins. That document becomes your operating map when the window is live.
Plan the Cutover Timeline: Stage First, Switch Second
The safest reasonable default is a two-phase migration.
Phase 1: build and test the new environment off the live domain. Create the new database, import the WordPress content, upload the files, configure the site, create the required mailboxes, and prepare SSL and DNS values. The public domain should still point to the old provider during this stage.
Phase 2: cut over the public services in a strict sequence. Update website routing, confirm SSL issuance or activation, switch mail-routing records, and then run send/receive and form-delivery tests.
A simple timeline looks like this:
| Timing | Action | Owner |
|---|---|---|
| 24-48 hours before | Lower TTL if allowed, export backups, list mailboxes and aliases, confirm rollback values | Site owner or migration lead |
| Before cutover day | Stage WordPress on the new host, create mailboxes, prepare SSL and DNS records, test on temporary host or staging URL | Migration lead |
| Cutover window | Freeze content changes, update DNS, validate SSL, switch MX/TXT records if needed, test mail flow | Migration lead plus mailbox tester |
| First 2-24 hours after | Monitor errors, contact forms, login issues, email send/receive behavior, and stale DNS reports | Site owner and support contact |
If you need a separate internal tracker for approvals, cutover ownership, or client checklists, a lightweight web app generator can be a useful resource for building that internal workflow. Keep it separate from the public migration itself; the runbook should remain boring and observable.
Migrate WordPress Content: Files, Database, and Environment Settings
WordPress moves cleanly when you treat the site as three parts: files, database, and environment settings.
- Files: themes, plugins, uploads, and configuration files.
- Database: posts, pages, settings, menus, forms, and plugin data.
- Environment settings: database credentials, PHP/version settings if relevant, cron behavior, cache rules, and the site URL handling.
Start by creating the new database and database user in the control panel. Import the database dump. Upload the WordPress files to the target document root. Then update the database connection values in wp-config.php or the relevant environment settings used by the new host.
The common failure point is not the copy itself. It is the small environment mismatch afterward: the wrong database name, a plugin that expects the old absolute path, a cache layer serving stale redirects, or a form plugin still sending notifications to the wrong mailbox. That is why I prefer a staging validation checklist over assumptions.
Before the public switch, verify these items on the staged copy:
- Homepage and core service pages load: Home, Website Hosting, and Contact are good candidates for a quick test pattern.
- WordPress admin login works.
- Media files render correctly.
- Permalinks, forms, and navigation behave normally.
- No hardcoded old-domain URLs remain in critical templates or settings.
If your migration includes a redesign or custom workflow changes, separate that project from the infrastructure cutover unless the team is very small and the risk is clearly owned. Combining a platform move, a theme overhaul, and an email migration in one window is how “minimal downtime” becomes a generous phrase.
Migrate Email Safely: Mailboxes, Aliases, and Mail Routing
Email cutover deserves its own checklist because the business notices mail issues faster than it notices a slightly stale website cache.
In the new email environment, create every mailbox and alias before you touch MX records. Match names, forwarding rules, and shared accounts carefully. Confirm storage quotas and password-reset processes. If the old system uses catch-all behavior, decide explicitly whether to reproduce it. Accidental catch-all is not a security feature.
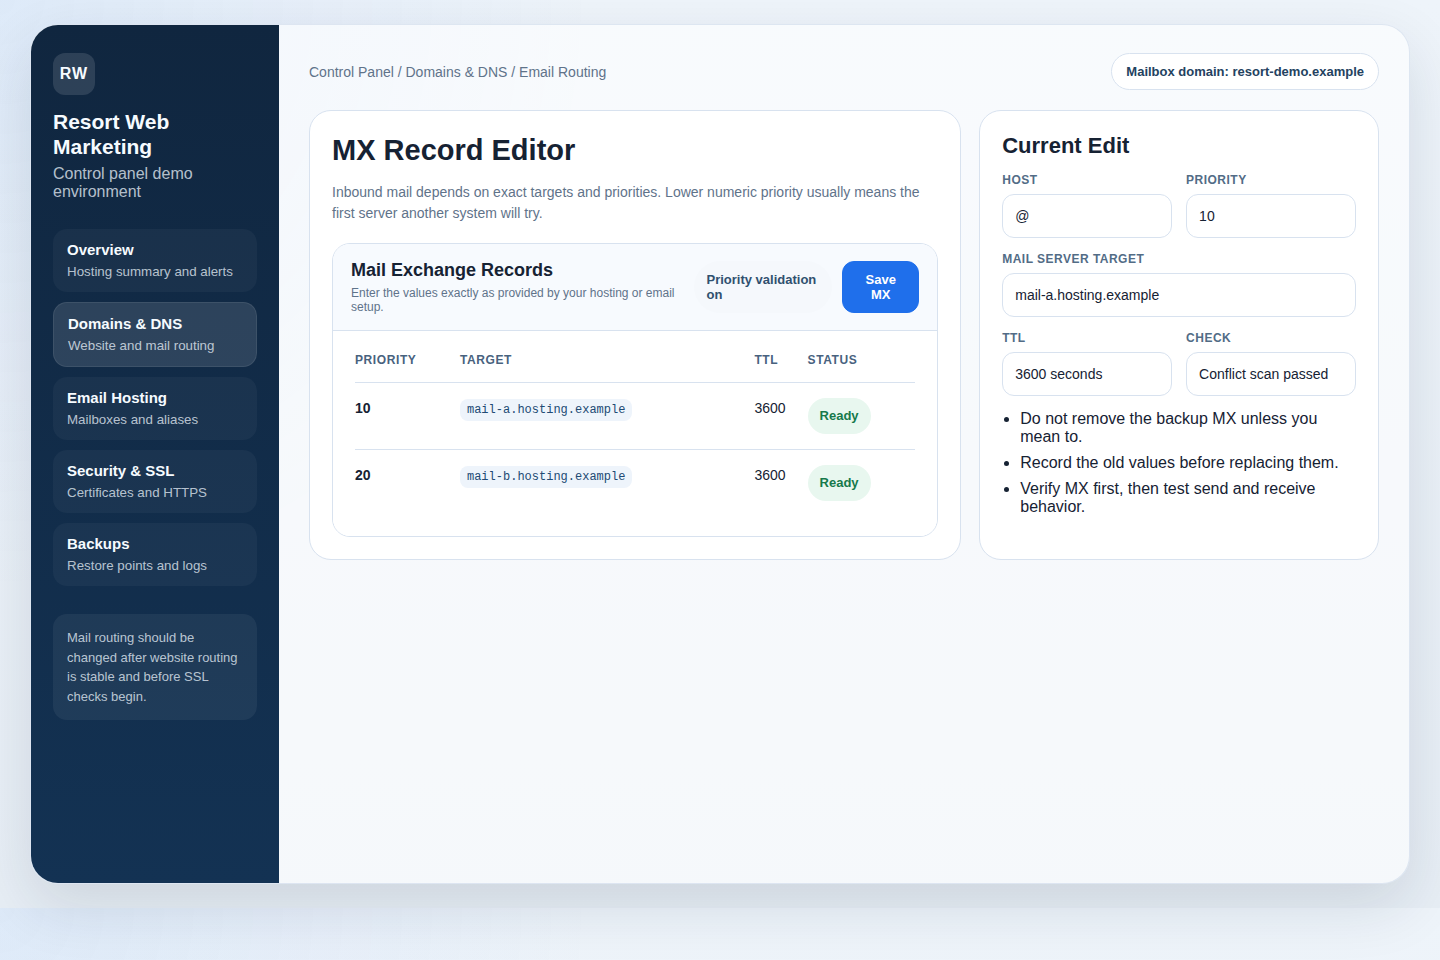
For DNS, record the current mail policy values before you replace anything. You should know the live MX targets and the current SPF, DKIM, and DMARC state. Then prepare the new values in advance so the cutover window is mostly copy, paste, verify.
| Email Item | What to Prepare Before MX Switch | Why It Matters |
|---|---|---|
| Mailboxes | Create users, set quotas, test passwords or reset workflow | Users need immediate access once new mail starts landing |
| Aliases and forwards | Recreate aliases and delivery rules | Missed aliases often look like “random missing email” |
| SPF/DKIM/DMARC | Prepare TXT values and policy notes | Deliverability problems often appear after the switch, not before |
| Webmail test | Confirm users can sign in to webmail | Webmail is the fastest neutral test when mail apps disagree |
A practical example: if the new mailbox exists but the old MX records are still live, new inbound messages will continue landing on the old provider. That is fine during preparation. The problem begins when someone assumes the mailbox is already live and stops monitoring the old account. Keep both sides visible until the cutover checks pass.
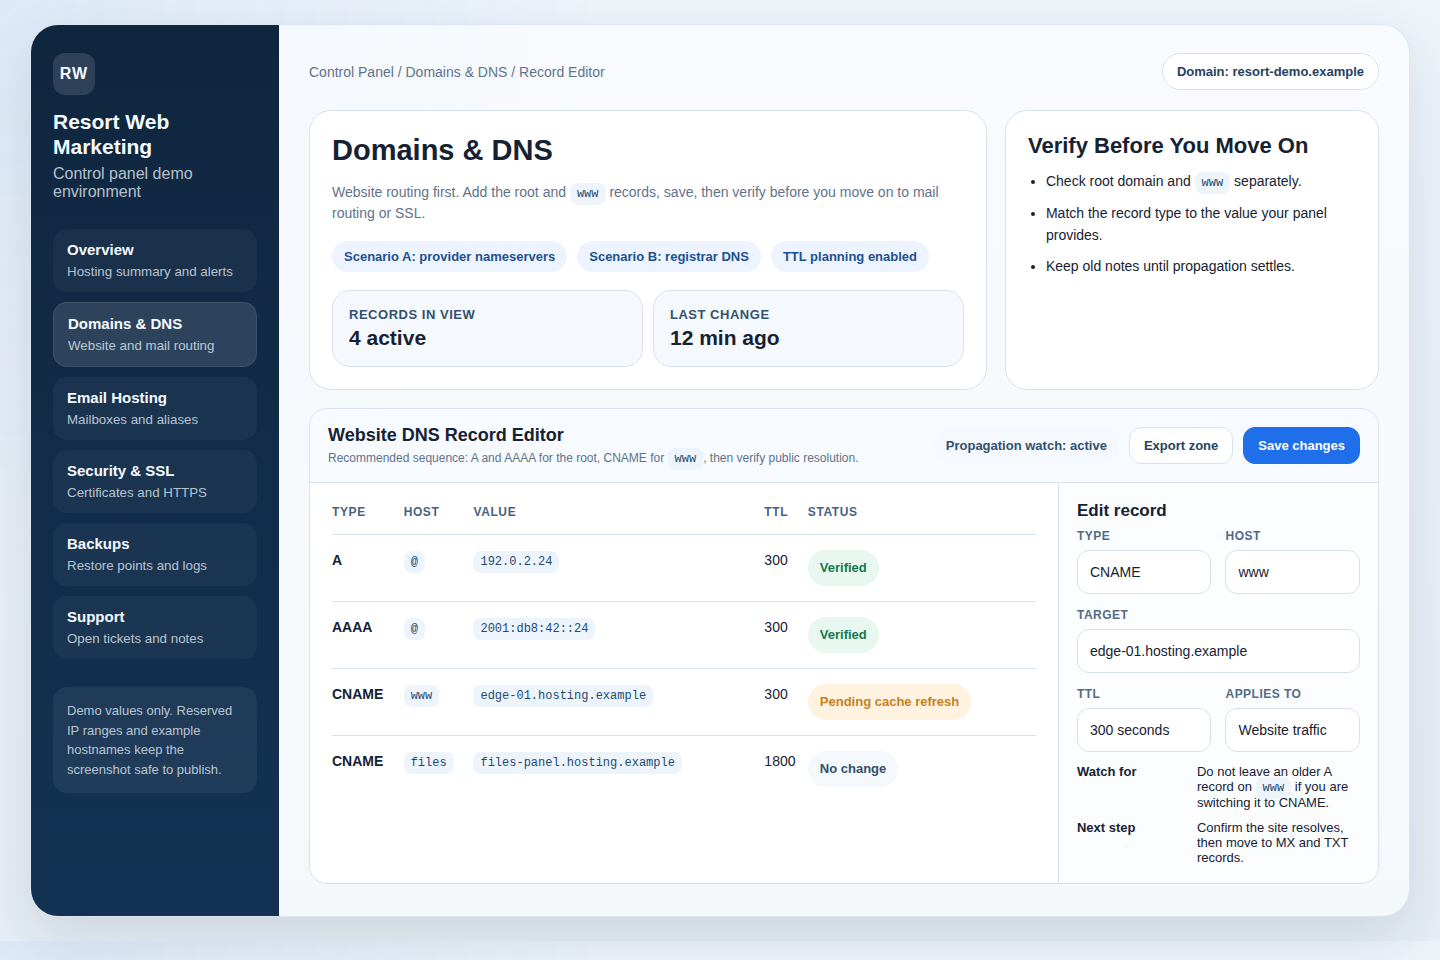
DNS and SSL Coordination: The Right Order of Changes
When the staged site is ready, use a strict change order:
- Freeze live content changes. Pause updates on the old site so the staged copy does not drift further.
- Update website-routing records. Change the A, AAAA, or CNAME values for the website hostnames.
- Validate the site on the new environment. Check that the new host answers correctly.
- Enable or confirm SSL. Issue or validate the certificate once the domain points correctly.
- Switch or confirm MX/TXT records for the email platform.
- Run send/receive and form-notification tests.
This order reduces confusion. If you switch MX first and website DNS later, your mailbox tests and website tests are happening across two different timelines. If you request SSL too early, you may spend time troubleshooting a certificate that is waiting for DNS to settle. Order is expensive to plan and cheap to obey.
Keep Security & Backups nearby during the window so the rollback options and certificate status are easy to inspect. If DNS behavior becomes unclear, the more useful question is “Which record changed, where, and when?” rather than “Why is the internet being emotional?” The internet is often emotional about caches.
Test Before Go-Live: What Must Pass
Before you declare the migration complete, test both business functions and technical functions. A website can load while a contact form fails. A mailbox can accept inbound messages while outbound mail still fails SPF alignment. That is why the go-live checklist should be explicit.
- Website: homepage, a service page, a blog post, admin login, plugin-critical pages, redirects, and media rendering.
- Forms: submit at least one contact or inquiry form and confirm delivery to the intended mailbox.
- Email inbound: send a message from an external account to a migrated mailbox.
- Email outbound: send from the new mailbox to an external account and confirm receipt.
- DNS: confirm the live records match the intended values.
- SSL: confirm the site serves over HTTPS without certificate warnings on the public hostnames.
If any of those fail, decide quickly whether the issue is small and local or whether it meets your rollback threshold. Not all victories are worth defending past the point of good judgment. A fast rollback is often the wiser move than a stubborn half-hour of improvised fixes on live mail flow.
Cutover Execution: The Exact Sequence to Follow
Here is the sequence I recommend for a typical small-business WordPress and email migration:
- Confirm the staged site and prepared mailboxes one last time.
- Pause edits on the old site. No new posts, product edits, or form changes.
- Take a final database export and final note of current DNS values.
- Update website DNS records.
- Validate the new site response. Check key URLs and admin access.
- Enable or verify SSL on the new host.
- Update MX and required TXT records if the mail platform is moving.
- Log in to webmail and test external send/receive.
- Submit a form and confirm the notification arrives.
- Monitor for at least one defined observation window.
During that observation window, watch for 404 pages, login failures, missing media, broken redirects, undelivered form notifications, and mailbox-specific issues. If your team needs help at that point, use Contact Support with exact symptoms, timestamps, and the records already changed. A good support request is shorter and more precise than a heroic retelling.
Post-Migration Verification and Cleanup
Once the site and email pass the initial checks, do the slower verification work:
- Review logs: web server errors, WordPress debug signals if enabled, and mail-delivery logs available in the platform.
- Check forms and transactional mail: make sure website notifications reach the intended inbox.
- Confirm DNS consistency: the intended A, CNAME, MX, and TXT values are still in place after the first cache cycle.
- Verify mailbox behavior: aliases, forwards, and role-based accounts behave as expected.
- Raise TTL again if you lowered it for the move: once the environment is stable, longer TTL can reduce unnecessary query churn.
This is also the right time to update internal documentation: where the site is hosted now, who owns DNS, where SSL is managed, where backups are initiated, and how the team should reach support. If you are moving to a more centralized setup, Request Hosting Plan based on the environment you actually need, not the one you have been working around.
A Safe Default for Small Teams
If you want the shortest version of this runbook, it is this: stage the new WordPress copy, pre-create the mailboxes, document the DNS changes, switch the website first, verify SSL second, switch mail routing third, and keep rollback criteria written down before the window begins.
That will not remove every variable. It will remove most avoidable ones. If you are preparing the move now, Get Started with a hosting setup that keeps website, email, DNS, and backups visible from one place, or Contact Support to map the safest migration path for your current setup.