Most beginner mistakes in hosting come from the same disease: people click until the screen stops looking scary, then assume the task is finished. It usually is not. A control panel helps only if you know what “done” looks like.
New customers usually come in with a tight cluster of questions. Where do I connect the domain without wrecking email? Where do I create a mailbox and verify it actually sends? Where are the website files, and which folder is the live one? Where do I create the database and confirm the credentials before an install fails in a less imaginative way? And where do backups, SSL, and security live when the boring checks suddenly matter?
For broader planning context, teams can compare guidance from web.dev guidance before choosing a workflow.
This guide is for that first real login. Not the marketing tour. The actual working session where you need to manage a live website and business email from one place without wandering into false leads. If you want the broad platform overview first, start with Control Panel. If you already have access and need the practical workflow, stay here.
What you will learn: where the main sections usually live, what to click first for domains, email, files, databases, SSL, backups, and security, and what to verify before you tell yourself the task is complete. That last part matters. Control is not the same thing as access. Control means you can check the result.
Written by Felix Rowan
Updated June 4, 2026
Related implementation details are also covered in MDN Web Docs, which helps keep tool decisions grounded in established practices.

What “Full Control” Means in Plain Terms
Ignore the grand language for a minute. In normal business terms, full control means one account area lets you manage the parts that regularly depend on each other: domain routing, website hosting, mailboxes, webmail, files, databases, SSL, backups, and basic security. If those pieces live in separate places, you can still get the work done, but you will spend more time proving what changed and what did not.
That matters because these jobs are linked whether the interface admits it or not. A domain change can interrupt website delivery. The same change can leave email untouched, or break it, depending on what you changed. An SSL problem can look like a website problem. A file update can fail because the database credentials are wrong. A mailbox can exist perfectly and still fail because the DNS records tell the outside world a different story. Symptoms lie less than dashboards do.
If you use Website Hosting and Email Hosting from the same operating view, the point is not convenience for its own sake. The point is context. You want to rule out the boring thing first, not discover four hours later that the boring thing was hidden behind a different login.
| Area | What You Need to Do | What “Done” Looks Like |
|---|---|---|
| Domains & DNS | Attach domain, review records, save changes carefully | Website hostnames resolve correctly and mail records still match the intended service |
| Create mailbox, set password, confirm limits or aliases | User can log in, send a message, and receive a reply | |
| Files | Open live web root, upload or edit files, review permissions | The right files are in the right location and the site reflects the change |
| Databases | Create database, create user, assign privileges, verify credentials | Application connects successfully with the saved credentials |
| SSL | Enable certificate, confirm hostname coverage, force HTTPS if needed | The browser shows HTTPS cleanly on the intended domain variants |
| Backups | Check schedule, retention, restore options | You know what can be restored and from where before trouble starts |
| Security | Review login protection, alerts, and access controls | Basic protections are active and the status is visible |
Your First Login: Where to Find the Important Sections
Most control panels put the same categories in roughly the same neighborhood, even when the labels vary. Look for a main navigation area that separates account-wide tasks from site-specific tasks. The usual destinations are:
- Domains or Domains & DNS for domain connections, nameserver clues, and record editing.
- Email for mailbox creation, aliases, forwarding, quotas, and routing.
- Webmail for browser-based inbox access.
- Files, File Manager, or FTP/SFTP for the live website files.
- Databases for database creation, users, and sometimes import or admin tools.
- Security or SSL for certificate status and access protections.
- Backups for schedules, restore points, and recovery actions.
- Support or Help for escalation when the panel stops answering the question.
Before you change anything, do one quiet, unglamorous pass through those sections. Open each one and confirm the domain list, mailbox list, web root, database area, SSL section, and backup area are all visible. The first diagnostic step is to map the terrain before you edit it. People skip that, then spend the rest of the afternoon asking whether the missing setting was never there or just hidden under a tab called something clever.
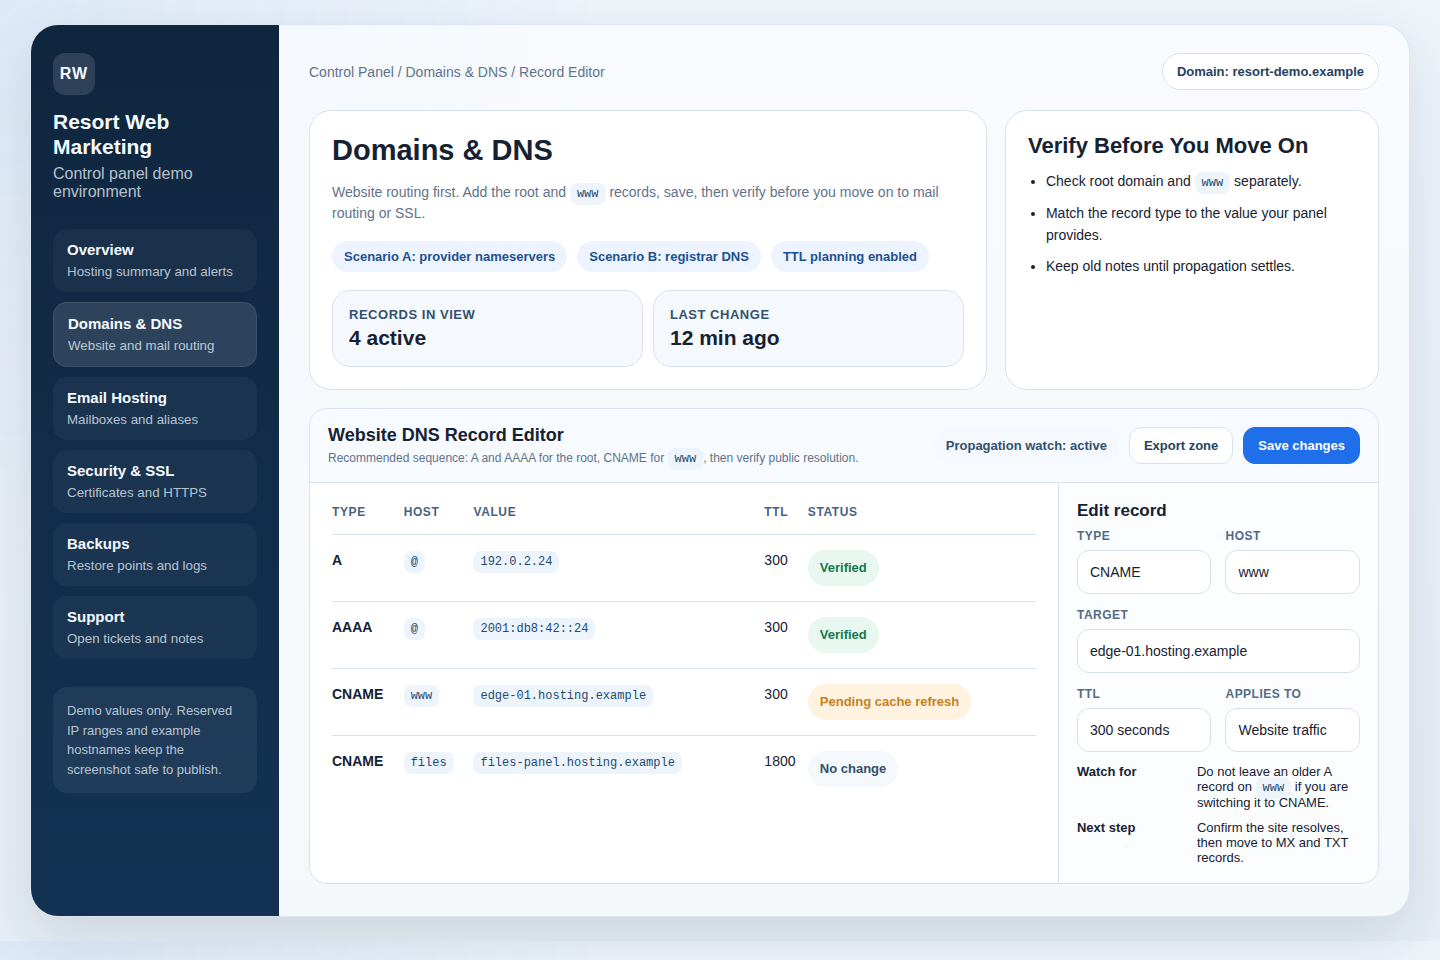
Step 1: Connect a Domain Without Breaking the Rest of the Setup
Domain work is where beginners do the most damage with the fewest clicks. The actual problem is usually not that the controls are hard. It is that the controls look similar while doing very different things.
Start in Domains & DNS and answer four questions before you save anything:
- Are you attaching the domain to hosting, changing nameservers, or editing individual DNS records?
- Which records affect the website, and which records affect email?
- Do you need the root domain,
www, or both? - Are you trying to move the website only, or website and mail together?
For a basic website connection, you usually touch A, AAAA, or CNAME records. For business email, the sensitive records are normally MX and supporting TXT entries. The point is not to memorize acronyms like a hostage note from the internet. The point is to keep web and mail changes separated in your head.
What to click: open the domain list, choose the active domain, open the DNS record editor, and review the current records before changing them. Take note of the existing MX and TXT entries before you edit anything website-related. If the panel has comments, export, history, or notes, use them. If not, write the current values down somewhere. Humans call that tedious. Outages call it disrespect.
What to verify: after saving, confirm the intended website hostnames point where they should and that the mail records were not altered unless you meant to alter them. If the panel shows propagation or status notes, read them instead of inventing panic. A DNS change can be correct and still take time to show up everywhere. Correct-but-not-visible-yet is annoying. Wrong is worse.
A quick example: if you are moving only the website, it is common to update the records that control the site while leaving the MX and related email records alone. Beginners often change more than needed because switching everything feels cleaner. It is cleaner only when it is also correct.
Step 2: Set Up Business Email and Confirm It Actually Works
Mailbox creation is simple right up until it is not. A lot of control panels make the first half easy: create the address, set the password, save. The second half is what matters: can the user sign in, send a test message, receive a reply, and understand where to access mail every day?
Inside Email Hosting, look for mailbox management first, then aliases, forwarding, quotas, spam controls, and routing. The exact labels vary. The workflow does not:
- Create the mailbox on the correct domain.
- Set a strong password and store it safely.
- Review the quota or mailbox size if the panel shows one.
- Add aliases or forwarding only if they are actually needed.
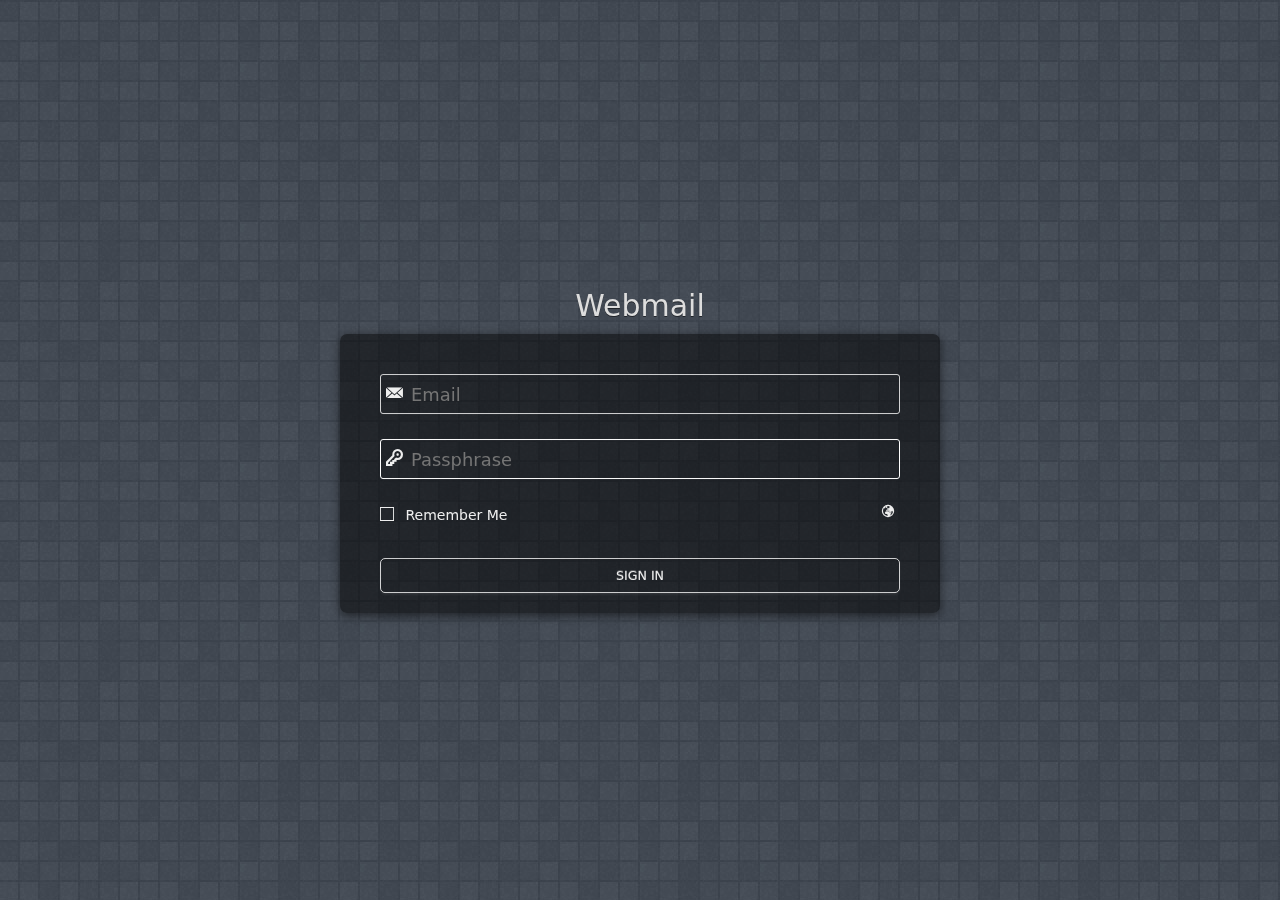
- Open the login path for Webmail so the user has a browser-based fallback.
What to verify: sign in with the new mailbox, send one message out, receive one reply back, and confirm the From address is correct. That small send/receive test rules out a lot of nonsense quickly. If the login works but mail does not send, check routing and DNS. If sending works but receiving does not, check the mail records and mailbox status before chasing ghosts in the user’s laptop.
For small teams, it is also worth checking the boring operational bits immediately: can you reset the password later, suspend access cleanly, or add a role address such as support@ or billing@ without creating a fake person account? Those are normal business tasks, not edge cases.
Step 3: Access Your Website Files Without Guessing Which Folder Is Live
The file manager is where confidence goes to fake itself. People see folders, upload a file, and assume they are in the right place. Sometimes they are editing staging. Sometimes they are in the wrong domain root. Sometimes they upload the file correctly and the website ignores it because the application is reading a different path. Charming.
Open the file management area and look for the live document root for the domain you are working on. On a simple site, this is usually the folder where the public website files live. On a busier account, there may be multiple domains, staging copies, logs, backups, or system folders nearby.
What to click: open the domain, find the associated web root, review the folder structure, and only then upload or edit files. If the panel offers a log viewer, bookmark that area mentally. Error logs and access logs are often the fastest way to tell whether a broken page is a file problem, a permission problem, or something deeper.
What to verify: after a file change, reload the site on the expected URL and confirm the visible result. If nothing changes, rule out caching, wrong path, and wrong environment before re-uploading the same file like a ritual. Also review permissions rather than setting everything broadly writable because frustration is making suggestions again.
A beginner-safe rule is simple: if you are not sure whether a folder is live, stop and identify it before editing. The file manager is not dangerous because it exists. It is dangerous because it rewards confident mistakes.
Step 4: Manage Databases So the Application Can Actually Connect
This is the part many beginners avoid because databases look like “developer territory.” Fine. Reality declines the distinction. If your website uses a database, you need enough control to create one, create a user, assign the right privileges, and confirm the application is using the same credentials.
Open the database section and look for three things: the list of existing databases, the list of database users, and the place where privileges or user assignments are managed. Some panels also expose import/export tools. Useful, but not the first priority.
What to click:
- Create the database with a clear name that matches the site or environment.
- Create a database user with its own username and password.
- Assign that user to the database with the permissions the application requires.
- Copy the database name, username, and password carefully into the application configuration.
What to verify: confirm the application connects successfully after the credentials are saved. If the install or site throws a database connection error, do not start randomly changing passwords. Check the exact database name, the exact username, the saved password, and whether the intended user is attached to the intended database. The actual problem is often one missing character, not a cosmic betrayal.
A practical example: if a site import succeeds for files but the homepage shows a database connection error, the missing step is often not the import itself. It is the application config still pointing to old database credentials. That is why files and databases should be managed in the same session whenever possible.
If your team eventually needs an internal admin tool on top of the hosting workflow, that is a separate build decision. A neutral planning resource such as this web app generator can be useful later. Just do not confuse “we might build more tooling” with “we have verified the current database settings.” Different problem.
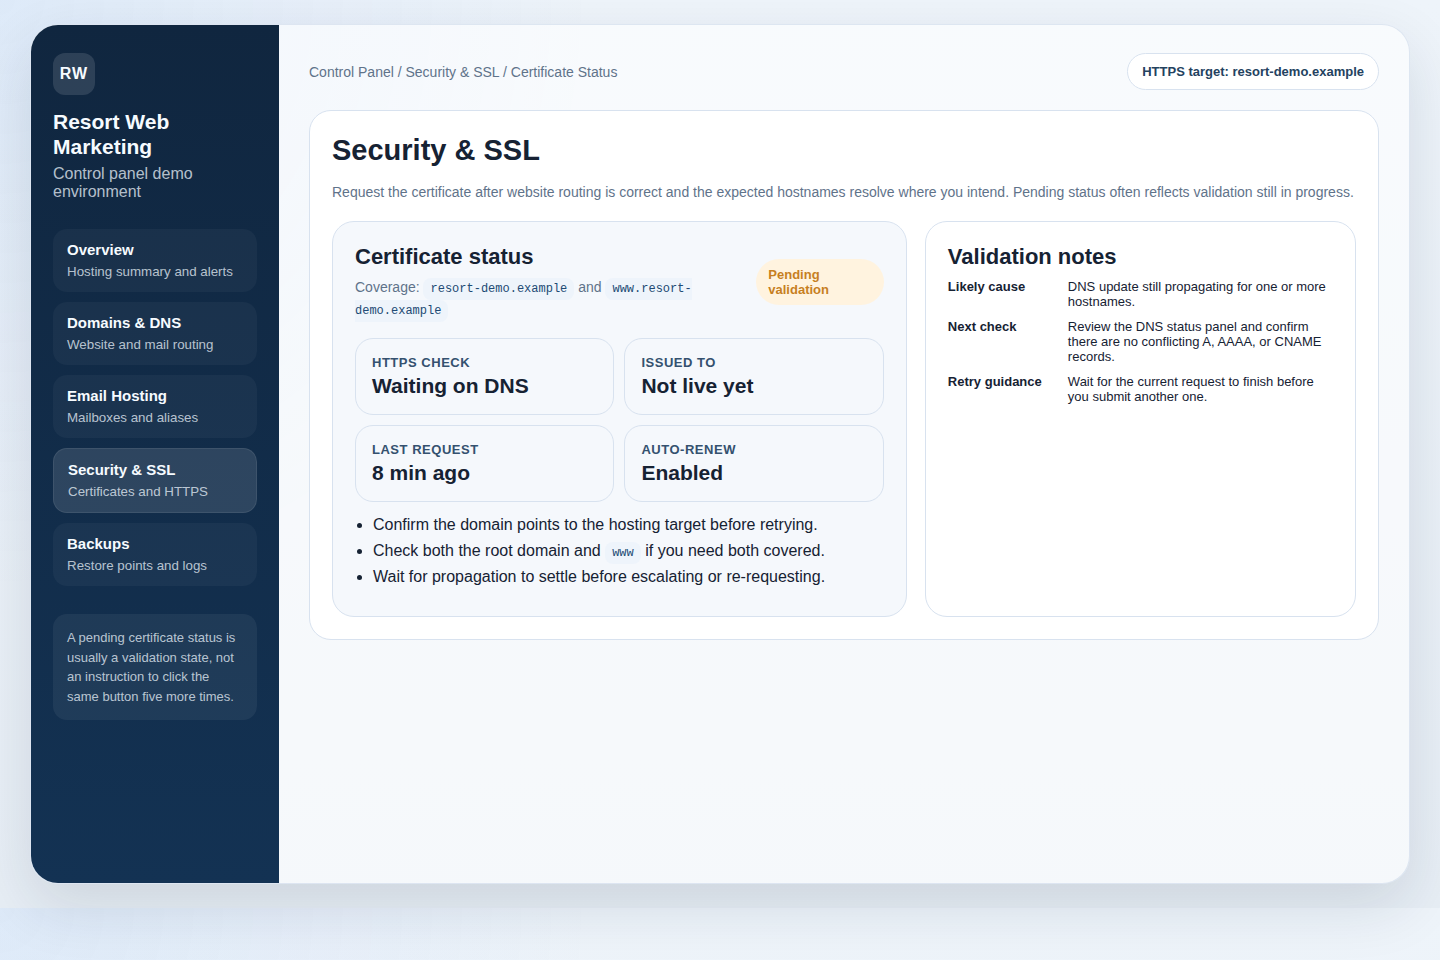
Step 5: Enable SSL and Confirm the Secure Version Is Really Active
SSL is another area where people love the checkbox and ignore the result. The checkbox is not the result. HTTPS loading cleanly on the right hostname is the result.
In the SSL or security area, check whether the control panel shows:
- certificate status,
- covered hostnames,
- renewal behavior, and
- forced HTTPS or redirect settings.
What to click: after the domain is attached, enable or request SSL, then review the status panel. If the panel distinguishes between the root domain and www, look at both. If there is a redirect option for HTTPS, use it only after the certificate is active. Forcing HTTPS before the certificate is ready is a good way to create a memorable afternoon for the wrong reasons.
What to verify: open the secure URL in a browser, confirm the lock state is clean, and test the expected hostname variants. If one version works and another throws warnings, the job is not finished. If the panel shows the certificate as pending, check domain control and give validation time to complete before changing five other things in anger.
Step 6: Check Backups and Restore Readiness Before You Need Them
Backups are easy to praise and oddly rare to test. A control panel earns its keep here by answering three plain questions: when are backups taken, what do they include, and how do restores actually work?
Open Security & Backups or the backup section in the dashboard and check:
- backup frequency,
- retention period,
- whether files, databases, and email are included,
- available restore points, and
- whether restore is self-service or support-assisted.
What to click: review the schedule, inspect the restore area, and make sure you know where the restore option lives before an emergency. If the panel allows manual backups before risky changes, that is worth using. Not because disaster is guaranteed, but because preventable downtime is a boring form of self-harm.
What to verify: confirm that at least one usable restore point exists and that you understand the scope of recovery. Can you restore only files? Only the database? The whole account? If you do not know, you do not have a restore plan yet. You have an optimistic feeling.
This is also the moment to decide when to stop improvising and open Contact Support. If the change touches domain routing, SSL, files, and mail at the same time, the fastest path is often a controlled escalation, not more clicking.
Step 7: Turn On the Security Basics and Review Status
Security advice gets bloated fast, so keep it practical. Beginners do not need an ideology. They need a short list of protections that should already be visible in the control panel.
- Strong account passwords: obvious, still ignored, still useful.
- Login protection: rate limiting, account lockout, or similar controls against repeated bad sign-in attempts.
- User separation: avoid sharing one master login if multiple people manage the account.
- Status alerts: certificate issues, storage limits, login anomalies, or backup failures if the panel exposes them.
- Review access regularly: old users and forgotten mailboxes are the administrative equivalent of leaving keys in the door.
What to verify: the settings are active, not merely visible. If the panel shows a status badge, read it. If the security section is blank, learn whether that means “nothing is wrong” or “nothing is configured.” Those are not the same sentence.
Common Beginner Mistakes to Avoid
- Changing nameservers when only one DNS record needed to change. Bigger motion is not smarter motion.
- Creating a mailbox and never testing send/receive. Login success is not delivery success.
- Uploading files without confirming the live web root. Staging folders love overconfident people.
- Creating a database but forgetting to assign the user. Then blaming the application.
- Enabling HTTPS without checking hostname coverage. One working URL does not prove the whole setup is clean.
- Trusting backups without checking restore scope. “We have backups” is not the same as “we can recover quickly.”
- Using one admin login for everyone. Convenient until it is not, which is the exact day it matters.
Final Takeaway
A beginner-friendly control panel is not one that hides complexity under shiny labels. It is one that lets you see the actual moving parts clearly enough to manage them without superstition. If you can connect the domain, create the mailbox, reach webmail, edit files, verify the database, enable SSL, review backups, and confirm the security basics from one place, that is real control.
The first diagnostic step before any change is still the same: map the panel, identify the exact service you mean to affect, and check the boring thing first. That rule saves more time than cleverness ever has.
Manage Hosting if you are already inside the account and know the next task, or Request Hosting Plan if you want a cleaner starting setup for hosting, email, DNS, SSL, and backups.